"Quick Find" Feature in the Productivity Power Tool Extension in Visual Studio 2010

If you are like me, then you have installed a number of productivity related extensions for Visual Studio 2010, and sometimes it is difficult to know which extensions have each feature.

One feature that is in the Productivity Power Tools is Quick Find feature that replaces the default Find and Replace windows with the following.

I don’t know about you, but I have a very healthy dislike for this feature - I am constantly clicking the dropdown box to select the Advanced Options to show the normal Visual Studio Find and Replace windows.

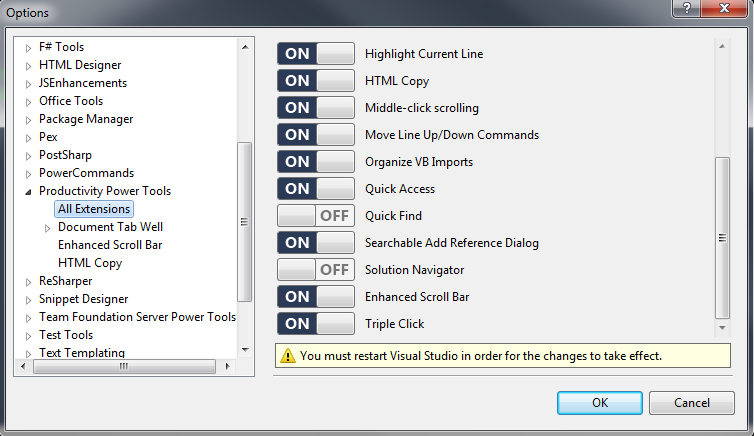
You can turn off this feature by going into Tools ➞ Options ➞ Productivity Power Tools in Visual Studio and turning off “Quick Find”.

Note that after changing this option you will also have to restart Visual Studio for the change to take effect.

Intellisense in Razor for Custom Types and Helpers

If you have custom types and custom ASP.NET MVC Helpers, and if you set your Visual Studio Web Project’s Build Output Path folder to something other than the default bin\ location, then you will be in for a little surprise - you will not see your custom types in the Razor Intellisense!

It appears that Razor’s Intellisense uses the assembly binding probing path of your Web Project’s root folder and the bin sub-folder.

If your Build Output Path is a sub-folder of your Web Project application base folder / root folder (although I don’t understand why you would bother) you could make a change to the web.config file and add a probing privatePath configuration such as:

1<configuration>
2    <runtime>
3        <assemblyBinding xmlns="urn:schemas-microsoft-com:asm.v1">
4            <probing privatePath="myBin" />
5        </assemblyBinding>
6    </runtime>
7<configuration>

However, in the more likely scenario that you have a common central location for all of your assemblies that is outside of your Web Project application base folder / root folder, then unfortunately by design (for security and side-by-side execution) there is no configuration setting in .NET that is going to help. You cannot load assemblies from outside of your application base folder (via configuration in .NET) - unless they are strong named and in the GAC.

In my scenario, the Build Output Path is outside of the Web Project’s root folder, so configuration is not an option, and my assemblies are not strong named, so the GAC is not an option.

One solution is to create a Visual Studio 2010 Extension or post-build script that copies all the assemblies from my custom Build Output Path into the local bin sub-folder. That would work, although it would also slow down my build times and frankly isn’t elegant.

A better solution is to take advantage of the fact that in my scenario the bin sub-folder does not actually exist in my Web Projects. I can make it exist in Windows 7 by creating a symbolic link named bin which points to my Build Output Path - and then magically Razor Intellisense works!

Note that when you create a symbolic link you need to have Administrator privileges.

The syntax to create the symbolic link is:

1mklink /d x:\MyWebProject\bin y:\MyCommonAssembly\Bin

Minimal Configuration Required for Razor Intellisense in ASP.NET MVC 3 RTM

Recently I have been creating some custom ASP.NET MVC 3 Helpers and have been working with some customised Visual Studio 2010 Web Projects (we effectively separate our Web Areas into individual Web Projects).

When working in these customised Web Projects for Web Areas, I have faced some issues with the Razor Intellisense. As it turns out, the issues were actually due to a lack of understanding of Razor’s requirements for populating its Intellisense.

And so, here is the absolute minimal configuration needed to get Intellisense working properly in Razor for an ASP.NET MVC 3 Web Project.

(1) A Visual Studio Web Project (sorry, I have not tried Class Library Projects)

(2) A web.config file in the root of the project, with the following contents:

 1<?xml version="1.0"?>
 2<configuration>
 3  <system.web>
 4    <compilation debug="true" targetFramework="4.0">
 5      <assemblies>
 6      <add assembly="System.Web.Abstractions, Version=4.0.0.0, Culture=neutral, PublicKeyToken=31BF3856AD364E35" />
 7      <add assembly="System.Web.Helpers, Version=1.0.0.0, Culture=neutral, PublicKeyToken=31BF3856AD364E35" />
 8      <add assembly="System.Web.Routing, Version=4.0.0.0, Culture=neutral, PublicKeyToken=31BF3856AD364E35" />
 9      <add assembly="System.Web.Mvc, Version=3.0.0.0, Culture=neutral, PublicKeyToken=31BF3856AD364E35" />
10      <add assembly="System.Web.WebPages, Version=1.0.0.0, Culture=neutral, PublicKeyToken=31BF3856AD364E35" />
11      </assemblies>
12    </compilation>
13  </system.web>
14</configuration>

This is a cut-down version of the file that is created when you create a brand new, empty MVC 3 Web Project in Visual Studio.

Razor looks to this file in order to determine which assemblies from the GAC to load into its Intellisense. The assemblies listed above are the ASP.NET MVC 3 assemblies that contain the base class for a Razor view (System.Web.Mvc.WebViewPage) and the extension methods for all the standard MVC Helpers - such as HtmlHelper which is accessed through the @Html syntax, etc.).

If you had your own MVC Helpers that were strong named and deployed to the GAC, you could add them to the assemblies element.

All assemblies that are in the Web Project’s private Bin folder are automatically loaded and made available in the Intellisense.

(3) A web.config file in the Views folder, with the following contents:

 1<?xml version="1.0"?>
 2<configuration>
 3  
 4  <configSections>
 5    <sectionGroup name="system.web.webPages.razor" type="System.Web.WebPages.Razor.Configuration.RazorWebSectionGroup, System.Web.WebPages.Razor, Version=1.0.0.0, Culture=neutral, PublicKeyToken=31BF3856AD364E35">
 6      <section name="host" type="System.Web.WebPages.Razor.Configuration.HostSection, System.Web.WebPages.Razor, Version=1.0.0.0, Culture=neutral, PublicKeyToken=31BF3856AD364E35" requirePermission="false" />
 7      <section name="pages" type="System.Web.WebPages.Razor.Configuration.RazorPagesSection, System.Web.WebPages.Razor, Version=1.0.0.0, Culture=neutral, PublicKeyToken=31BF3856AD364E35" requirePermission="false" />
 8    </sectionGroup>
 9  </configSections>
10
11  <system.web.webPages.razor>
12    <host factoryType="System.Web.Mvc.MvcWebRazorHostFactory, System.Web.Mvc, Version=3.0.0.0, Culture=neutral, PublicKeyToken=31BF3856AD364E35" />
13    <pages pageBaseType="System.Web.Mvc.WebViewPage">
14      <namespaces>
15        <add namespace="System.Web.Mvc" />
16        <add namespace="System.Web.Mvc.Ajax" />
17        <add namespace="System.Web.Mvc.Html" />
18        <add namespace="System.Web.Routing" />
19      </namespaces>
20    </pages>
21  </system.web.webPages.razor>
22
23  <system.web>
24    <httpHandlers>
25      <add path="*" verb="*" type="System.Web.HttpNotFoundHandler"/>
26    </httpHandlers>
27
28    <!--
29        Enabling request validation in view pages would cause validation to occur
30        after the input has already been processed by the controller. By default
31        MVC performs request validation before a controller processes the input.
32        To change this behavior apply the ValidateInputAttribute to a
33        controller or action.
34    -->
35    <pages
36        validateRequest="false"
37        pageParserFilterType="System.Web.Mvc.ViewTypeParserFilter, System.Web.Mvc, Version=3.0.0.0, Culture=neutral, PublicKeyToken=31BF3856AD364E35"
38        pageBaseType="System.Web.Mvc.ViewPage, System.Web.Mvc, Version=3.0.0.0, Culture=neutral, PublicKeyToken=31BF3856AD364E35"
39        userControlBaseType="System.Web.Mvc.ViewUserControl, System.Web.Mvc, Version=3.0.0.0, Culture=neutral, PublicKeyToken=31BF3856AD364E35">
40      <controls>
41        <add assembly="System.Web.Mvc, Version=3.0.0.0, Culture=neutral, PublicKeyToken=31BF3856AD364E35" namespace="System.Web.Mvc" tagPrefix="mvc" />
42      </controls>
43    </pages>
44  </system.web>
45
46  <system.webServer>
47    <validation validateIntegratedModeConfiguration="false" />
48
49    <handlers>
50      <remove name="BlockViewHandler"/>
51      <add name="BlockViewHandler" path="*" verb="*" preCondition="integratedMode" type="System.Web.HttpNotFoundHandler" />
52    </handlers>
53  </system.webServer>
54
55</configuration>

This is exactly the same file that is created when you create a brand new, empty MVC 3 Web Project in Visual Studio.

This web.config file importantly:

(a) Declares the default class that a Razor View/page inherits from (note: System.Web.Mvc.WebViewPage contains the Html and Ajax properties that are referenced by @Html and @Ajax respectively). The class that a specific Razor View inherits from can be overridden in the Razor syntax with the keyword @inherits.

(b) Declares the namespaces that are automatically imported - instead of having to use the @using Razor syntax. This is particularly important because it is the mechanism through which the MVC Helper extension methods are made available.

And that is all you need to get Razor Intellisense working!

Guidance for Using Optional and Named Parameters In C# & .NET 4.0

Leading up to the release of Visual Studio 2010 and Microsoft .NET Framework 4.0, there have been a few posts about how C# 4 now has parity with Visual Basic with regards to the ability to use Optional Parameters. Unfortunately, some of the examples that demonstrate this feature are… well… somewhat disturbing to me from a code quality perspective. In addition there is a lot of talk about how ‘cool’ this feature may appear (from 60,000 feet!), but there is little discussion about recommended guidelines for using Optional Parameters and when it is safe to do so.

Let’s start with the code analysis rule CA1026: Default parameters should not be used. Even in Visual Studio 2010, this rule still exists! Previously a large argument against using Optional Parameters was that code in VB.NET could use them but code in C# would not be able to use them. (This was especially annoying with COM interop!) Before C# 4, a C# coder would have to explicitly provide an argument for each Optional Parameter that was defined (annoying). While this is no longer a concern for C# coders, it is however still valid for consideration when creating methods that may be called from other .NET languages that don’t support the usage of Optional Parameters.

Recently this video on Named and Optional Parameters was released. While the author does a reasonable job conveying the essentials, the scenario is simply a code smell. From a clean code perspective, instead of passing a bunch of search criteria parameters to the ‘Search’ method, the SOLID principles should be used and the criteria should extracted into its own class… This would then mitigate the need for optional parameters in the first place.

In ScottGu’s blog post Optional Parameters and Named Arguments in C# 4 (and a cool scenario w/ ASP.NET MVC 2) [respect to ScottGu btw for your many good works :)], the “cool scenario” replaces a Nullable parameter named ‘page’ with an optional parameter that has a default value, citing that the Optional Parameter and default value on this public method essentially makes the behaviour of the method expressed “more concisely and clearly”.

Now, I agree that the code may appear slightly more ‘concise’, but I think it is quite arguable that it is more ‘clear’.

Side note: is ‘page’ a 1-based number or a 0-based index? Isn’t a page in the real world usually a 1-based number? e.g. “Page 1 of the search results”. In the spirit of the example code, perhaps the parameter really should be renamed to “pageIndex” - I think that would make the method more clear…

Getting back on track though: by inserting a default value into the method signature, a whisper of the internals of the business logic of this method is hard-coded into the public API.

Read that again… there is subtlety in there that leaves the feature of Optional Parameters open to unwittingly known abuse by the majority of the population! And it is the lack of clarity due to this subtlety that greatly concerns me from a code quality perspective.

What are the subtle caveats?

  1. As per the CLI specification, the default value must be a compile-time constant value.

  2. When compiled, the default value is emitted into a DefaultParameterValue attribute as metadata on the parameter within the method signature.

  3. When the compiler is compiling the code that calls the method, the compiler reads this value from the DefaultParameterValue attribute and actually hard-codes that value into the IL at the call-site. In other words, every line of code throughout all applications that call that method have this value hard-coded in their calling assembly.

As an example, if you are using say Version 1.0 of the assembly with the method which specifies a default value of 25 for the parameter, your code will be compiled and have the value of 25 hard-coded into your assembly. If you upgrade to say Version 1.1 of the assembly with the method (which now specifies a default value of 26 instead of 25), and if you do not recompile your code, your code when executed will pass the method a value of 25. The public API has been broken, and almost everyone would be unaware! (I found that this information is described in much more detail in C# 4.0 FEATURE FOCUS - PART 1 - OPTIONAL PARAMETERS and due to my concern about the age of the post I actually verified it myself with the help of Reflector…)

Anyone else flashing back to why “public [static] readonly” values should be used instead of “const”? It’s the same argument! The const value is treated as a literal and is hard-coded into each assembly that uses the value. (Conveniently, for more information, you can read THE DIFFERENCE BETWEEN READONLY VARIABLES AND CONSTANTS)

  1. Alternatively, if you as the caller of the method were to actually name the parameter in your calling code, and if you upgraded to the next version of assembly with the method which has had the parameter renamed, your code will not compile! Why? Because when using Named Parameters, the parameter name itself actually needs to be considered part of your API!

What should be the guidelines for using Optional and Named Parameters?

In general, I would suggest that Optional Parameters (just like the usage of the const keyword) should only ever be used with constant values that will never ever change over time - for example, mathematical constants… like the value of PI (although I don’t know why you would make PI an Optional Parameter… but you get the idea nevertheless). Generally and unfortunately however this will typically exclude any ‘constant-like’ values in your business domain. Values in business domains, while seemingly constant for now still can change over time as the business changes!

As always there are going to be a few perspectives on this. I find that it is useful to categorise development into two areas: (a) application development, and (b) reusable library development.

Especially when developing reusable library code, extreme care needs to be taken when creating and maintaining public APIs. I would suggest that Optional Parameters should NOT be used in public APIs of reusable library code… instead revert to the usage of method overloading, or redesigning your API.

However, in application development, where all the code is highly likely to be recompiled (and often), perhaps it isn’t so bad to use the Optional Parameters?… that is, until a team member decides to clean up the code by doing some refactoring and move that method into a reusable library… and then it all begins!

Summary

So for safety, clarity, simplicity and consistency across all code-bases (especially with the widely varying technical capabilities of developers), perhaps the best practice guidance for using Optional and Named Parameters should be:

  • Never use Optional Parameters in public methods; and
  • Only use Optional Parameters with default values that are constant in time (like mathematical constants and not apparent business domain constant values).

Program Specification Through the Mechanism of Automated Tests

My previous findings regarding the testing of public methods versus private methods opened the door to allow me to better understand that the mindset of a developer performing unit “testing” is different from the mindset of a developer “specifying program behaviour through the mechanism of automated test methods”. The difference is subtle but important.

In the concept and terminology of Behaviour-Driven Development, Design, Analysis and Programming, the resulting program code is simply an implementation of previously specified behaviours. Those said behaviours are initially defined at the business level via the process of requirements gathering and specification, and can be expressed in the business’s language as a set of scenarios and stories. These requirements can then be further analysed and broken down into logical and physical program specifications.

Regardless of whether a test-first approach to development is taken, by the end of the construction task, there should be a set of test cases (automatic and/or manual) that were successfully executed and that covers all of the logic specified in the program specification. In other words, by the end of the construction task, the developer has verified that the program behaves as specified.

Typically a program’s specification is written in a document somewhere which is divorced from the location of the actual code - so great discipline and effort is required in order to keep the specification and code in synch over time. Depending on the company and financial constraints of the project, this may not be feasible.

However, what if we could remove this boundary between the document and the code?

Automated test cases serve a number of useful purposes, including:

  • Behaviour verification;
  • Acting as a “safety net” for refactoring code;
  • Regression testing;
  • Professional evidence that one’s own code actually does what one has said it does; and
  • Acting as sample code for other developers so they can see how to use one’s code.

What if the automated test assets were the actual living program specification that is verified through the mechanism of test methods?

This concept has been recognised before, and the libraries JBehave, RSpec, NBehave and NSpec have been the result. While I honour the efforts that have gone into those libraries and the ground-breaking concepts, I do not necessarily like the usage of them.

In fact, all I want right now is to be able to express my specifications in my MSTest classes without the need for a different test runner or the need for another testing framework. In addition, I want other team members to easily grasp the concept and quickly up-skill without too much disruption.

While a DSL might be more ideal under these circumstances, I write my automated test assets in the C# language. Working within that constraint, I want to express the program specification in test code. With special note to the agreeable BDD concept that "Test method names should be sentences", I devised the following structure for expressing program specifications as automated test methods.

 1namespace [MyCompany].[MyAssembly].BehaviourTests.[MySystemUnderSpecification]Spec
 2{
 3    public class [MyPublicMethodUnderSpecification]Spec
 4    {
 5        [TestClass]
 6        public class Scenario[WithDescriptiveName]
 7        {
 8            [TestMethod]
 9            public void When[MoreScenarioDetails]Should[Blah]
10            {
11                // Test code here
12            }
13
14            [TestMethod]
15            public void When[AnotherSubScenario]Should[Blah]
16            {
17                // Test code here
18            }
19        }
20    }
21}

This structure allows for the naming of the public method that is under specification (the parent class name), a general scenario with a description of the context or given setup required (the nested MSTest class name), followed by the test method names which further narrow the scenario and provide descriptive details of the expected behaviour.

The test names look neat in the Test View in Visual Studio (when the Full Classname column is visible), and are readable just like their corresponding stories.

The full class name in this instance would look like:

1[MyCompany].[MyAssembly].BehaviourTests.[MySystemUnderSpecification]Spec.[MyPublicMethodUnderSpecification]Spec+Scenario[WithDescriptiveName]

With automated spec/test assets/classes structured in this fashion, instead of developers performing unit “testing”, developers can instead embrace the mindset of “specifying program behaviour through the mechanism of automated test methods”. In turn, developers should be more focused on their tasks and it should also lead to higher quality code bases.

Oh, and I haven’t even mentioned how much easier it would be for a developer new to a project to learn and understand the code base by looking at the test view and reading all the scenarios that have been specified and coded…

If you wanted an even better way to define your program specifications and test assets, then I highly recommend SpecFlow.

TeamReview 2010 Installation Problem

The other day, a work colleague asked for my assistance regarding a problem installing TeamReview 1.1.2 (for Visual Studio 2010 Beta 2).

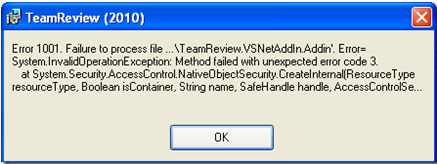
The error related to “TeamReview.VSNetAddIn.Addin”, with:

System.InvalidOperationException: Method failed with unexpected error code 3.

This error message is not very helpful, so I decided to use my friends Reflector and LinqPad to help me look for the offending code and then quickly execute and replicate the exception.

To cut a long story short, I discovered that the exception occurs under Windows 7 when the following Visual Studio add-in folder does not exist:

C:\Users[Your User Name]\AppData\Roaming\Microsoft\MSEnvShared\Addins

This equates to:

%APPDATA%\Microsoft\MSEnvShared\AddIns

The problem also happens on Windows XP:

C:\Documents and Settings[Your User Name]\Application Data\Microsoft\MSEnvShared\AddIns

In order to resolve the issue, manually create the folders through Windows Explorer or run the following command:

1mkdir %APPDATA%\Microsoft\MSEnvShared\AddIns

Another work colleague has now raised this issue on the TeamReview CodePlex site.

Intellisense for ASP.NET Markup Not Appearing In Visual Studio 2008

I recently came across the problem where the intellisense for ASP.NET markup was not appearing in Visual Studio 2008.

After doing a Google search, I had gathered and tried the following suggestions:

  • In Visual Studio: Tools ➞ Options ➞ Text Editor ➞ All Languages ➞ Turn on “Auto list members”
  • Reinstalling Resharper
  • Deleting the HKEY\Local Machine\Software\Microsoft\VisualStudio\9.0 registry node (which then prevented Visual Studio from running!)
  • Repairing Visual Studio
  • Uninstalling and then reinstalling Visual Studio

And still it didn’t solve my issue - there was still no ASP.NET intellisense for me!

The solution was to right click on a .aspx page in my solution, select “Open With” and change the default setting back to “Web Form Editor”.

Somehow, someway, this had changed.

Hopefully this will save someone else a few days of hassle!